Shell Toolz - File Transfer Made Easy
While working in the OSCP labs, I found myself performing a lot of the same tasks over and over. One of those tasks was transferring files back and forth between a host that I compromised and the attack system. Various methods exist for transferring files. Examples of methods I previously used include:
- FTP (bidirectional)
- Meterpreter (bidirectional)
- Netcat (bidirectional)
- Samba (works mostly from Windows host - only sometimes on Linux)
- SCP (bidirectional)
- TFTP (bidirectional)
- wget (download to host only)
This is not an exhaustive list of methods, but clearly there are a lot of methods that can be used. So why invent a new way of doing this? Well, for one thing each of these methods tends to have some dependency and limitation. The limitations become even more apparent when you are pivoting through one or more other hosts and you find yourself on a network that either (a) blocks outbound connection attempts or (b) simply cannot route back to your attack host. There are well known methods for getting around these problems, but sometimes they require setting up port forwards, etc and that takes a bit of work. To transfer small files, I often found myself doing this:
Attack Host
base64 -w0 < payload.bin
Remote Host
echo -n "INSERT_BASE64_HERE" | base64 -d > /tmp/payload.bin
chmod a+x /tmp/payload.bin
/tmp/payload.bin
This method works fine for smallish files and can be reversed to download files from the remote host as well. While working on the Windows platform, sometimes I use the exe2bat method. This method works great on Windows, but there are two major drawbacks:
- There is a limit of 64kb file size due to limitations with the debug utility
- exe2bat produces many, many lines of output which can be a pain to copy/paste. This can be made easier though by opening the output file in leafpad and doing a "select all" followed by a "copy"
Despite the limitations of exe2bat, I thought it was pretty cool to essentially copy and paste a file from one window on the attack system to the victim system. This doesn't work on Linux, unfortunately. So I set out to write a set of tools that could do this and more under Linux. Honestly, the code to do this is super simple but once I developed this and included it in my normal workflow, I found it to be incredibly useful.
Features
- Simple command used to convert a binary file into a command payload that can be used to rebuild the file on the remote host
- No need to "select all" and "copy" text from a terminal window or text editor (for bin2sh)
- Automatic compression of the file using gzip
- Integrity checking built in using md5sum
Dependencies
This tool was developed using a standard installation of Kali Linux. It interacts directly with the clipboard to achieve the copy and paste functionality, without having to manually select text and copy it yourself. To accomplish this, there is a dependency on the Kali system, which can easily be resolved by installing the xsel package as follows:
apt-get -y install xsel
As far as the remote system is concerned, it should work on any standard Linux distribution.
Installation
The package can be downloaded from Github and installed as follows:
git clone https://github.com/blackwolfresearch/shell_toolz
Within this package, you will find three shell scripts:
| bin2sh | Convert binary file on attack system into clipboard shell command payload |
| shx | Convert binary file on victim system to base64 package for extraction with unshx |
| unshx | Parse contents of clipboard looking for data encoded with the shx tool and then rebuilds file from it |
Tool - bin2sh
This command will take a given binary file, compress it, convert to base64 and then produce a command payload that will reassemble the file on the remote system. Commands are automatically placed on the clipboard with the xsel tool. Once you paste these commands into a shell on the remote system, the file will be decompressed, reassembled and then the file integrity will be checked against the original using md5sum.
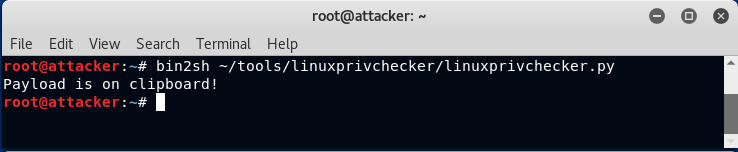
Here is an example of what this looks like. Suppose we want to transfer a tool like linuxprivchecker.py to the victim system by pasting it into a netcat shell. First, we run bin2sh as shown here:
Now we can simply paste this into the netcat listener that is handling a reverse shell connection from the victim host:
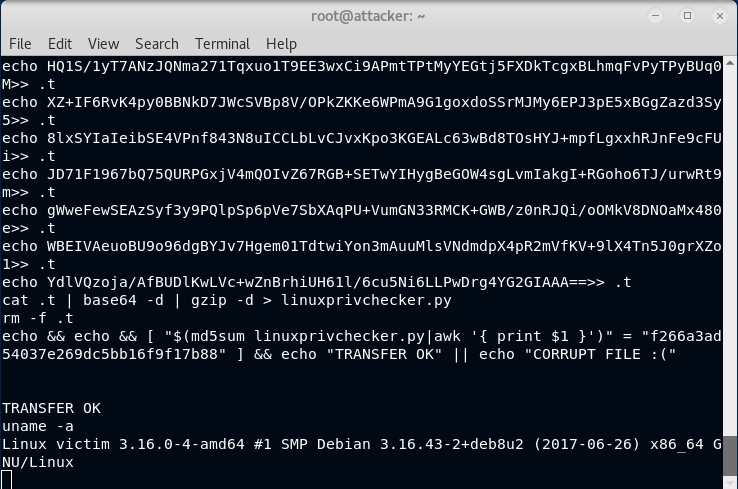
As you can see from the above screen, the tool also verified the integrity of the file
Tool - shx
This command is meant to be run on the remote system in a terminal window. It will take a binary file, compress and base64 it, then output a pair of delimiters with the base64 data between it. Once this command is run, you can do a "select all" and "copy" in the terminal. Then run the companion program, unshx, on the attack system. Here is an example of what it looks like when you run this command within a netcat shell on a victim system:
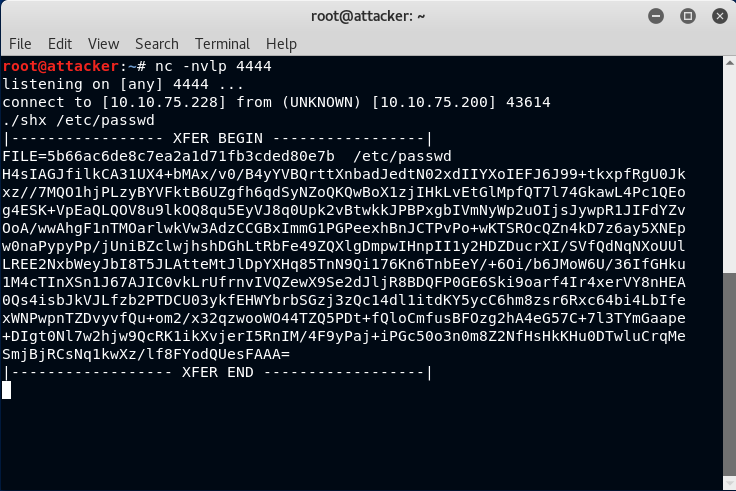
It should be rather obvious how this is formatted. Now all that you need to do is do an Edit -> Select All followed by an Edit -> Copy in the terminal window. It doesn't matter if there are 10 lines of output or 10,000 (assuming your scrollback setting is large enough to buffer the entire contents). It also doesn't matter if you do this many times in a row while in the same shell. The unshx command will only ever extract the last one. This makes for a very efficient copy and paste workflow for transferring files back and forth
Tool - unshx
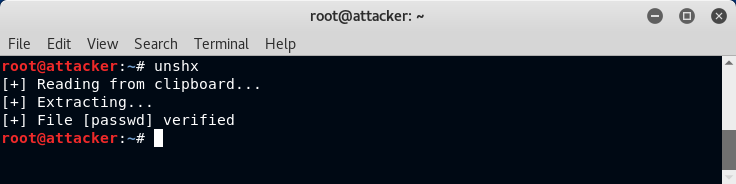
This command will extract data from the clipboard using the xsel utility. The data is assumed to originate from the above shx command. This script will search for the last set of delimiters found within the clipboard data. It will then use the base64 data found within the delimiters to decode, decompress and output the file using its original filename. File integrity checking is then performed based on metadata found between the delimiters. An example of how this works is shown below:
Note that there is no requirement to paste data from the clipboard or to specify the output filename. The file is written in the current directory with its original name.
Conclusion
I write tons of shell scripts for different things and I have no plans of posting most of them. However, despite the simplicity of these few scripts, I found them to be incredibly useful for moving files back and forth - a common task once you get a shell on a system. Obviously, this only works with a standard Linux distribution and not Windows.